mike's baking alphabet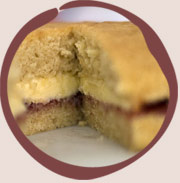
One of the many things that I've never understood is why so many people have never made a cake. There are lots and lots of people out there - in the pub, sat next to you on the bus, possibly even reading this article now - who have never discovered the simple joys of a sponge cake you made yourself, still warm from the oven, with a pot of tea. Anybody can make a cake, and if you've been following my somewhat sporadic writings on T&C you'll have picked up a few tips about how easy it really can be, and today I'm going to write about exactly how easy it is, and how simple the odd variation is, and why experimenting with cakes is worth every failed attempt. Yes...
C is for Cake.
There's a little bit of magic involved in making a classic sponge cake, but once you get to grips with the basic recipe you'll discover that it's a piece of - aha - cake to adapt it, experiment with it, mould it to fit what you might have in the cupboard to make it a bit special. A good sponge is moist, light, slightly crumbly and be ever so slightly sweeter than you'd expect. It should melt in the mouth, and smell like childhood, and have a lovely golden surface which begs to be broken with a good knife, or better still, a cake fork.
We'll cover that last bit first; the golden surface. If your oven is too hot the surface will burn before the middle is cooked. Similarly, if it's too cool it will inevitably dry out before the surface looks properly done. My oven is a gas one, but it has accurate temperatures - checked with an oven thermometer - and your oven may differ. Fan-assisted ovens are particularly prone to giving odd cake results, and when recipes say "refer to manufacturer's instructions" and the manual for the oven says "refer to the recipe" then you know you're in trouble. Rule of thumb for fan-assists; reduce temperature by 10 C, increase cooking time by 10%, but don't hold me to that. Like I say, I use a gas oven, and for basic sponge cake I use GM3, roughly 165C , 325F.
ingredients:
butter
sugar
eggs
self-raising flour
baking powder
Maybe some vanilla if you like. You'll need all of these.
equipment
baking parchment
an 8" round tin
a sieve
decent-sized mixing bowl
small bowl
fork
wooden spoon and metal spoon
If you have a rubber spatula, then that's good too. You really do need scales as well, but you can also use science if you don't have them.
You'll note that I didn't give proper quantities of your ingredients up there. That's because I don't know what they'll be. The classic, old time Victoria sponge you'll find in recipe books everywhere says "two eggs", plus - probably - 100g flour, a similar quantity of butter and sugar. But... how big are those eggs? Can you use two small eggs, or two extra large? What if you're using duck eggs (which make a rich sponge, which isn't to everybody's taste but worth trying once)? What happens if it's a double-yolker? There's no mystery to the solution, but it seems the only people who routinely use it are WI members.
 this is the take-home message from this article:
weigh your eggs
That's more-or-less it. Some recipe books even say that, but don't explain why, or even tell you what to do with the information. Once you've found out how much your eggs weigh, you use exactly the same weight of sugar, butter, and flour. If you're making a two-egg sponge, and the eggs weigh 110g in total, use 110g of butter, 110g of sugar, 110g of flour. It's that simple. If your eggs weigh over 125g you'll need two 8" tins. Under, and it'll fit in one tin but be thick enough to slice in half.
the cake tins:
an 8" round tin will just about accommodate 500g of cake mix, but if you're at all concerned don't be afraid to split it into two. Remember what I said about baking parchment in the last article? Take a length of it, scrunch it up, unscrunch and stuff it into the tin around the base. Don't bother with greasing the tin; silicone paper will cheerfully be non-stick enough to live with here.
you've weighed out the ingredients
Now crack the eggs into a small bowl and beat together until blended, then leave to one side. Take the butter and sugar (fresh butter, caster sugar) and if the butter isn't at room temperature - ergo, soft - when you start, pop it in the microwave for five seconds. Beat the sugar and butter together with the wooden spoon until light and fluffy; this is known as creaming the mixture. You can tell when it's done because it really does lighten up and go fluffy, and if you lightly tap the spoon on the side of the bowl the mix will drop off. If your butter isn't soft this process can take ten minutes of vigorous exercise which can be tiring on the wrists, if it is soft then five minutes. You'll feel every second of those five minutes, if this is the first time you've done it.
 Next, start beating the eggs into the mix. Add the eggs a bit at a time, beating them in before adding more mixture. If the mix looks like it has split - as in, separated - don't worry about it, just beat it a bit more and get it as smooth as possible. If you're using vanilla add a teaspoon of it now.
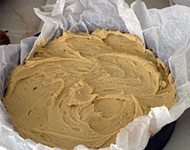
Add a teaspoon of baking powder to the self-raising flour, then add it to the mixture using a sieve. Using a metal spoon, gently fold the flour into the mix until it's all well incorporated. Folding the flour in is all about keeping as much air as possible in the mixture, so using the edge of the spoon cut through the middle of the mixture, scoop up the mix, and roll the spoon - and the mix - over the flour. Don't beat the mixture, treat it gently. Once the flour is all folded in, that's it. Put the mixture into the cake tin, and smooth the top over. Put in the oven on the middle shelf, and leave it for 35-40 minutes.
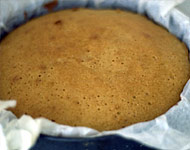 Remember the toothpick test from Brownies? It works here, too, although it need to be dry when it comes out. But you can also tell if a cake is done by listening to it, and looking at it, and smelling it. The cake should be golden brown on top, and have come away from the edges a little bit. It should smell sweet and biscuity, and it should be making faint little pops and whistles. But, use a toothpick as well, just to make sure the middle is cooked all the way through. If it's cooked, take it out of the oven, lift the parchment out of the tin, unwrap the sides, and leave to cool. If in doubt, put it back in the oven for five more minutes.
I'm covering decorating cakes in the next article, but here is a quick example of how you can fill a cake
If you have just one cake, slice it in half, spread it with home-made raspberry jam, some freshly whipped double cream and put the top back on. Dredge the top in icing sugar, then - if you're feeling particularly adventurous - heat up a metal skewer until glowing, and use this to burn a grid pattern in the icing sugar.
Now that we've covered the basic sponge, let's take a look at variations on a theme. Sponge cake is sponge cake is sponge cake. Once you've got the basics right you can add all sorts of things to it.
Want a chocolate cake?
Swap 25g of flour for 50g of cocoa. Or melt a 100g bar of chocolate over hot water (see last article), leave to cool, then stir this into the mixture before adding the flour.
Lemon cake?
Zest a lemon into the mixture - again, before adding the flour - and when the cake has come out of the oven spike a few holes in it with a cocktail stick, and drizzle the juice of the lemon mixed with two tablespoons of granulated sugar over the top, leaving it in the tin to cool.
 Practically anything can go into the mixture before adding the flour
Try adding an apple, cored, peeled and diced, or a handful of frozen fruit, or fresh fruit, or even dried fruit. When using fresh fruit you might need to add a bit more flour, but in the apple and berry cake (see photos) I only added 15g more flour for an apple and a handful of frozen berries, and it came out very well indeed.
Extra flavourings are fine, but steer clear of adding too much alcohol as it can affect the eggs, too much spice makes a cake taste like a scented candle, and if you want boozy cake you're far better doing the Christmas cake thing and drizzling it into cooked cakes. The Christmas cake thing? "Feeding" a cake with more alcohol, once a week, keeps Christmas cake moist and tasty as it matures in the run up to decorating it. I'm not covering Christmas cake as there are plenty of outstanding recipes due out in your favourite newspapers and magazines over the next month, but do give it a try as it is always worth the effort.
Different shapes? Sure!
For cupcakes fill the cases until you run out of mixture. A two-egg mix is fine for an 8" square tin, and a 2lb loaf tin. Just be careful not to overfill the thing you're cooking it in, and you'll be fine.
Once you've got the basic first steps right making a cake you'll discover it's an easy thing to put one together, and making a cake to give someone you're visiting is always worth the minimal effort involved.
C is also for Cookies.
I didn't mention biscuits last month because, well, Brownies. And I'm on 1700 words just on cake, so this will have to be quick, but basically: leave the dough alone for a while. Seriously. When making cookies or biscuits, once the dough has been patted together, or kneaded, or just finished off before baking, seal it in a ziplock bag or put in a bowl covered in clingfilm, pop it in the fridge and forget about it until tomorrow at the earliest. The difference is really noticeable, especially if you do proper blind tasting experiments with two batches, the ones left for longer tasting more toffee-like and much richer than those made straight away.
Generic cookie recipe.
Oven: 170C
Makes: "a truckload"
ingredients
225g softened butter
375g light soft brown sugar
50g caster sugar
3tsp vanilla extract
2 large eggs
400g plain flour
2 level tsp bicarbonate of soda
Beat the butter, sugars, extract until light and fluffy, then beat in the eggs and sift the flour and bicarb, and fold it in. Leave it in the 'fridge overnight, or longer if you can manage it. Tablespoon blobs onto a baking sheet covered in baking parchment or silicone paper. Put on the middle shelf in the oven for 12-14 mins or until coloured at the edges. Leave to cool for at least five minutes before moving onto a cooling rack using a palette knife.
This recipe demands that you add stuff to it!
Oatmeal & raisin (lose 100g of the flour, add 200g porridge oats & a ton of raisins and cinnamon)
or chocolate chunks
or chopped dried apricots or
white chocolate chunks and ground almonds
candied peel and more chocolate drops
chopped up bits of whatever chocolate bar you feel like (Rolos work, for example).
Basically, whatever you feel like experimenting with. I like bakewell cookies: dried cherries, ground almonds, and drizzle icing over the top. You can roll the dough into a log, wrap it in baking parchment and freeze, slicing discs off when you have a need for cookies but don't want a truckload all at once.
Check back next months for Mike's letter D baking recipes and tips...